Showing posts with label nailart. Show all posts

Wednesday, April 16, 2014

Easter Nails take one!

So as always I've decided to do holiday nails for you guys. My nail art skills Re definitely getting better every year with more and more practice. These were a little time consuming but we'll worth it!!! 
My six year old daughter and 3 year old niece LOVE these and here is what I used:
Butter London - Cotton Buds
Julep - Bess
Julep - Carrie
Julep - Lexie
Julep - Marjorie (On sale for $2.99!!! Such a pretty orange color for summer or fall!)
Zoya - Neely
Sinful Colors - Candy Coated
Sally Hansen Xtreme Wear - Black Out
And here they are in all their Easter glory:
Hope you like them! There are definitely more to come soon! And a post about my epic Sally's/ CVS haul!!!
Xx Ashley C.
P.S. I'd LOVE to see your easter manis!

Sunday, April 6, 2014

Broadway Nails imPRESS on Manicure Review!

For those of you who saw my Influenster unboxing post, you might remember that I received some press on nails! I haven't used press on nails since I was like 10 years old honestly... acrylics are just better and I've been trying to grow out my real ones, but for the sake of knowing if they are any good, I decided to try them out!

Today I bring you my review of Broadway Nails imPRESS on Manicure in the design "Space Cadet".
A set of these little fake nails runs about $6 at the drugstore. I believe they're made by Kiss Cosmetics, and you can get them anywhere from Walmart to Walgreens to Target to online. This design is pretty cute in my opinion, which is mainly why I decided to actually try them instead of giving them to my 6 year old daughter.
They look kind of like little black and white glitter giraffe print, so I'm not totally 100% sure why they're called Space Cadet.

Anyway. Each kit comes with 24 nails in 12 different sizes, and they're like medium length. Unfortunately this isn't long enough for me to justify actually buying them. My natural nails have been growing, so I had to place them pretty far up my nail to make sure my real nail didn't show through. They would definitely be ideal for someone with very short nails or none at all.

PROS: 
  • Super easy to apply, you just peel off the plastic on the back side and stick them on. 
  • No glue required. Less damaging to your real nail because you don't have to use glue or acrylic. 
  • Lots of different designs to choose from. I will include an Amazon link to my favorites
  • Supposedly last up to a week
CONS: 
  • A little on the expensive side. You can buy a full set at the salon for only like $15 more.
  • Not long enough for me to justify using/buying them
  • Still had trouble finding exact fits for my nails and didn't want to cut them
My overall experience with these is mostly positive. I've had them on about 24 hours now, and they haven't fallen off. They're cute and nice to look at. They're shaped well and not cheap looking at the ends. However, there is a gap between my real nail and the fake one, because they aren't long enough and the adhesive doesn't go all the way to the tip.

Here's some pictures. You will see what I mean about the placement. My hands look like I have grown out acrylics on, and the short pinky nail makes my hands look fat. 


There you have it! I probably wouldn't buy these, but they were fun to try!!

Xx Ashley C.

Tuesday, April 1, 2014

Rainbow nails!!

This post is going to be super quick but if I don't share these I might very well explode.
So, there was a challenge in one of the Facebook groups I'm in for rainbow nails...

So I did them and I used:
Julep:
  • Majorie
  • Lexxie
  • Nellie
  • Eden
  • Fiona

Zoya:
  • Elisa
  • Robin
Butter London - Cotton Buds
Sinful Colors- Black on Black
Pretty & Polished Matte Topcoat

First, I painted all of my nails white with Cotton Buds.
Then, like a day later (I'm really slow), I painted rainbow stripes on top of them with a striper brush.
The greatest part about these nails, is that it doesn't matter how bad you are at drawing stripes because you're not even going to see them for long. :D I suck at stripes.

THEN once the rainbows are COMPLETELY DRY (SUPER IMPORTANT) carefully apply striping tape in the opposite diagonal direction of the rainbow lines. Paint your whole nail black and slowly peel the tape off while they're still wet. 
I then painted them with a matte topcoat.... just because I like matte and ended up with THIS AWESOMENESS!

I wish I could have these nails always.

Xx Ashley C.


Saturday, November 30, 2013

Snowmen Nail Pictorial!

So I did these nails about a week ago and have been putting off posting them because they aren't as awesome as I wanted them to be. But here is a tutorial anyway! They were pretty easy to do as far as nail art goes, and you only need a couple of tools to accomplish these.

You will need:
Large dotting tool
A brush suitable for tiny details on your snowman & snowflakes
A small dotting tool or toothpick for little snowflakes
Makeup sponge
Whatever colors you want to use

Start by painting your nails a light blue color. I used Cinderella by Sinful Colors. I had to do like 4 coats because this is a pretty transparent color, but it was my only light blue.

Next I decided to add an gradient with purple just to make them a little bit prettier. This is actually really really easy to do, and all you need is a triangle makeup sponge!! I used Sally Hansen's Purple Pizazz which is a purple Jelly color with lots of shimmer. Paint on the two colors you are using on the sponge like THIS:
Then you gently apply it to your semi dry nails starting at the side and over and over until you get the brightness you are trying to achieve. Here's what my looked like when they were completed:
The next step is to apply your snowman. Start by placing a large dot on your nails like this:
Then add the bottom of the snowman near the tip of your nail. It doesn't have to be perfectly round.
Next, add the top snowball part of the snowman like this:
Next paint on your snowman's buttons, face, hat, nose, arms, and even a scarf if you want! I thought mine was pretty cute with a red scarf. :)
Almost done!!! Next, I decided to add some snowflakes and glitter, just to make them a little bit more "wintery". :) You don't have to do this though. After you're done with that, add a topcoat and that's all there is to it!!! I used Julep's Portia for the glitter.
I think my snowflakes look horrible, sorry. LOL But that's okay :) There you have it! Super easy snowman nails for your holiday season!

What holiday nails should I do next??? I was thinking maybe Santa nails or something... I'm running out of ideas already! :D

Until next time, Don't forget to follow & like us on Facebook!
Xx Ashley C.

Sunday, November 24, 2013

Christmas Lights Nail Pictorial!

This year I am feeling unusually festive. I've already decorated my house with Christmas lights, and have been pinning Christmas nails and crafts like a mad woman. I know it's not even Thanksgiving yet, but I've already done my Thanksgiving nails for the year, and I can't think of anymore to do. Don't worry I'll show you those in a minute. :) It's freezing in Tennessee today and it already feels like winter so why not get a head start!! Christmas nails are my favorite to do and there's endless possibilities!!! Here is a simply, three step tutorial for some ADORABLE Christmas light nail art.

But first, here's my turkey Thanksgiving nails for your viewing pleasure.

On to the Christmas lights! For this mani I used:
The first step is to paint all of your nails white. I tried to pick a nice opaque white with little to no shimmer. Next, I went ahead and added a coat of my fast dry topcoat to make the nails dry enough to start painting on the lights! I also went ahead and cleaned them up to ensure there would be no bleeding of the colors together from the remover in cleaning up later.


The next step is to paint on your string that the lights are going to painted on. I picked black for this, but green would also work if you're looking for a more traditional Christmas light feel. I used the thinnest brush in my collection that I could find. I also saw on Pinterest that you can use a piece of thread for this to make a really thin string of lights. You just place it where you want while your nails are still tacky and trim it then put a topcoat on to hold it in place.  


Next, use a small brush, dotting tool, or even a toothpick to carefully paint on the lights. I used a toothpick that way I could get a tiny triangular shape for the lights. It allows for precision and I think if you're a beginner it would be your best bet. The best part is you can pick any color you want! You can do just red and green, or multicolored lights like I did! Just make sure and alternate the colors you're using. I painted on one color at a time. I used red, blue, green, and yellow. Sorry for the bad quality photo. My camera was not cooperating. :( Once you're done with that, add on your favorite topcoat and you're done!

And that's all there is to it! Super easy, Super cute nails for Christmas!
Here's a picture of my favorite one! :)

Hope you guys enjoyed my tutorial!!! I think these nails are super cute and I will definitely be trying them again with different variations and hopefully a little less mess. Until next time!

Xx Ashley C.

Sunday, October 13, 2013

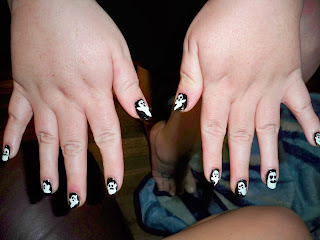
Ghost Nail Tutorial!!

I love October. More importantly I love Halloween. Especially Halloween inspired nails. I did Nicole's nails Friday night and we decided on ghost nails. Even better they glow in the dark! :)
Here's how you can do it yourself!!

For this mani we used:
Julep - Cleopatra
Sally Hansen - Hard to Get
Random black nail polish
Night Lights Glow in the dark polish that I bought from Sally's years ago... it's great.


And here's what it looks like completed!!


And here's the glow in the dark!! 

Hope you enjoy this super easy Halloween inspired tutorial!!
:D Xx Ashley C.


Wednesday, October 9, 2013

Mani of the day!!

I'm so so so excited for fall!! I can finally wear my sweaters, boots, hoodies and fall colored nail polishes!! For my nails today I decided to do a glitter ombre! I am OBSESSED with glitter ombres and fades right now. They are super cute for any season but I think my favorite gold glitter is perfect for fall! I probably need a little bit more practice with them but I'm really liking my nails!! Hope you enjoy! :)

For this mani I used:
Sephora by OPI - I'm with Brad
Sinful Colors - All About You

The glitter ombre itself was really easy to do! All you need is a makeup sponge. First paint you nails a solid color and wait until they are almost all the way dry. Then you paint the glitter onto the sponge and just sponge it on slowly and make sure there is more at the tip of the nail! :) Then seal it with a topcoat of course!


Another tragedy I'm also out of cuticle oil!!! Anyone have any suggestions for a brand that will help a really big problem with cracking cuticles???


Hope you guys enjoy it as much as I do!! :)
Don't forget to subscribe and like us on Facebook!!
Xx Ashley C.

Saturday, October 5, 2013

Music Note Nail Tutorial!

Last night I did the cutest nails and I figured I'd show you how to do them as well!! It's one of the easiest tutorials ever so here you go!

For this mani I used:
Julep - Annette
Sally Hansen Xtreme Wear - Black Out
Seche Vite Top Coat

First you paint your nails a solid color. I picked Julep Annette because it's kind of grey and kind of white and I hoped it would go on smoothly. It, however went on horrible and gloopy so forgive the mess. I should have just used regular white.

Next take a striping brush and paint three thin lines on the tips of each nail like this:
Mine are a little messier than I'd like them to be.

Next with a dotting tool, pen, bobby pen end, or a rounded end brush paint two dots on the lines. I did some of mine on the lines and some of them in between so the notes weren't on the same lines on each nail. :)


Then you finish off the notes. Paint lines on the dots on the right side and form your notes! I chose to do different notes on each nails to make it look more like sheet music. :)


And you're done!! Super easy peasy and adorable nail art for your weekend!
Enjoy!

Don't forget to subscribe and follow us on Facebook to get all the updates! :D

Xx Ashley C.


Tuesday, October 1, 2013

Mini Drugstore Haul!

Walgreens is pretty much my favorite drugstore ever. They always have the best stuff on sale!!! I told you guys I was going to get another Wet N Wild palette and lucky me they were still on sale for $2.00!!!!


I picked up Walkin' on Eggshells which is one the of neutral trios. Can't wait to test it out tomorrow!! You can buy it here!! 

I also have been dying for some gel liner.... mine from Sephora is sadly all dried up and I was on a super budget so I decided to pick up some Elf cream liner for $3.00!! I've never tried it before but I like the Elf products that I have tried so far so I figured why not. Pretty excited! Even more excited now that I just realized it comes with a brush too! 
I know I said yesterday I was going to review the Julep liner today.... BUT I woke up way later than anticipated this morning and did a bad job on my makeup. I'm probably going to actually review both Julep and Elf liners tomorrow or this next day so watch out!!

I also grabbed two really great looking nail polishes by Sinful Colors because they were 2/$3 and the matte color display totally sold me. I bought a reddish orange matte color called "Laced Up" and a Hot Pink/Fuschia color called "Forget Now". I tried out Laced Up earlier and it goes on really really nice. It only took two coats and went on perfectly smooth. I can't really decide if it is more orange or more red.... I vote orange and my husband votes red... So you can decide... Please ignore my horrible black tips I was going to Halloween colors. lol I also haven't even bothered to clean up. :)

  
So great and matte. 

AND last but certainly not least my husband had two wonderful gifts waiting on me when I arrived home... in the form of mustaches. 


Have a great night!!! 
Xx Ashley C. 

Monday, September 30, 2013

Julep Maven October Bombshell Unboxing!

For those of you who don't know what the Julep Maven program is, its a month polish subscription box with different style profiles. You receive either 2 polishes and one beauty product, two beauty products, or three polishes for $19.99 a month. It's usually hit or miss with me but lately I have been loving what they have!!
If you want to sign up you can use my referral link HERE and use the code "FREEBOX" to get your first box for free. They also give you the option of adding additional polishes on for like... $4.99 which is super cheap! That's how I ended up with almost 100 lovely Juleps in my collection. :)


I was so excited to receive my October Julep box today. I want to apologize in advance that I took the majority of these photos with my cell phone in my car. I couldn't contain myself any longer!!! This box is so awesome. Not only was it free but I love every single thing in it. I only wish I had ordered some add ons... especially Casper... which glows in the dark...

ANYWAYS here is my October Maven box this month!!!

Julep did a pretty bad job wrapping up my goodies this month... but that okay. It's what's inside that counts right?

And here's what it looked like without the tissue paper.

I received the Bombshell box this month, which is the one the quiz picked out for me... I'd say its pretty accurate. Bombshell is usually what I order.

This months Bombshell Maven box came with their Kajal eye glider (eyeliner) in a dual ended pencil in brown and black, a "black latex" color called Cleopatra, and a greenish teal microglitter color called Valerie which I've heard has been for sale at Sephora for awhile. They also added a little bag of candy corn which I love so that is pretty great too.


Not going to lie I was a little on the fence about the whole nailpolish maker making an eyeliner thing... but I actually really like what I see so far with this liner. I'm a bit of an eyeliner snob as you've probably noticed and I usually only use gel and liquid, but the Kajal liner I received is nice and dark and goes on really smooth. I only wish we could have chosen between brown and black and not gotten a dual pencil. I never use brown liner. Only black. 
It also came with what Julep has deemed "the best sharpener they've ever used" but I haven't used it yet. I don't really see what could be so special about it.... :) 

See how nice and rich the colors are?! So excited to use it for work tomorrow.

Here's another swatch picture for you.

This is really the only picture I took that properly shows all the shimmer in Valerie.. It's a really really pretty greenish teal color with lots of different colored shimmer. It only took two coats on my toes to be fully opaque.

Without flash
With flash

And overcast outside

Maybe I'm missing something here but I'm pretty sure Cleopatra is just a matte black. Either way I'm really in love with it. It went on sooo smooth and again, two coats and it was totally opaque. Clean up was super easy and it dried really fast. Cleopatra is going to be a great color for Fall/Halloween for me.

Here is Cleopatra with Valerie dots as an accent... but you can't really see them. Both great colors though, just not so much together :)

And here is it again wish flash for you!

So that is my October Bombshell box. Overall it is super great and I will try out the eyeliner for real tomorrow and type up a little review of it!!! :) Have a good night and don't forget to follow us on here and on Facebook!!

Xx Ashley C.